This section covers how to update an existing training Resource.
Open resources from the Employee List / home page
The Resource List will open showing a blue header with options for filtering Resource information.
By default, the full list of Active training Resource Companies will be listed below the header but may be many pages long. Use the filter to avoid going from page to page. Clicking in the – List Filter – Field box will give the option to start typing a Company Resource name. This will speed the filtering process.
Clicking on a training Resource company in the list, will open the Resource Update screen.

In the black ribbon on top of the blue header are the options to Add a Resource, access the Help feature or Return to the previous screen.
Within the Blue header changes may be made to any of the fields. Changes are committed to the system as you exit each field.
The white ribbon below the header allows you to toggle between the Resource’s Contacts and Course List. The Contact List is shown by default. The contact information can easily be update or deleted inside of the list.
To access the Course List, simply select the link.
The entire list of courses associated with this resource will be shown. The course information can easily be updated inside of the list. The Rank, Comments and Status can be updated. The Main check-mark shown here is not editable from this location. This check-mark is used to indicate which Resource is the main or default provider for this course. For this reason, the default resource for a course is managed on the Course Update page. At the very right side of the blue ribbon at the top of the list the option Add Course is available. This feature allows you to associate an existing course to the current resource. The 3 icons below the Add Course button are explained in the following diagram.

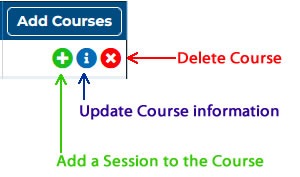
Actions taken through the use of these buttons will affect the Course for this Resource only.